Migrating your warranty system feels like changing a tire on a moving car. You're worried about losing years of customer data, your team revolting against a new tool, and angry customers caught in the crossfire.
We know this feels like open-heart surgery on your CX org, and the worry is fair: a migration takes real work. This warranty system migration checklist gives that work a sequence your team can execute, one phase at a time.
New claims move to the new system first, and your old claim history stays in a read-only archive your team can still search. Ten steps across three phases take you from the spreadsheet you run today to a process you can measure.

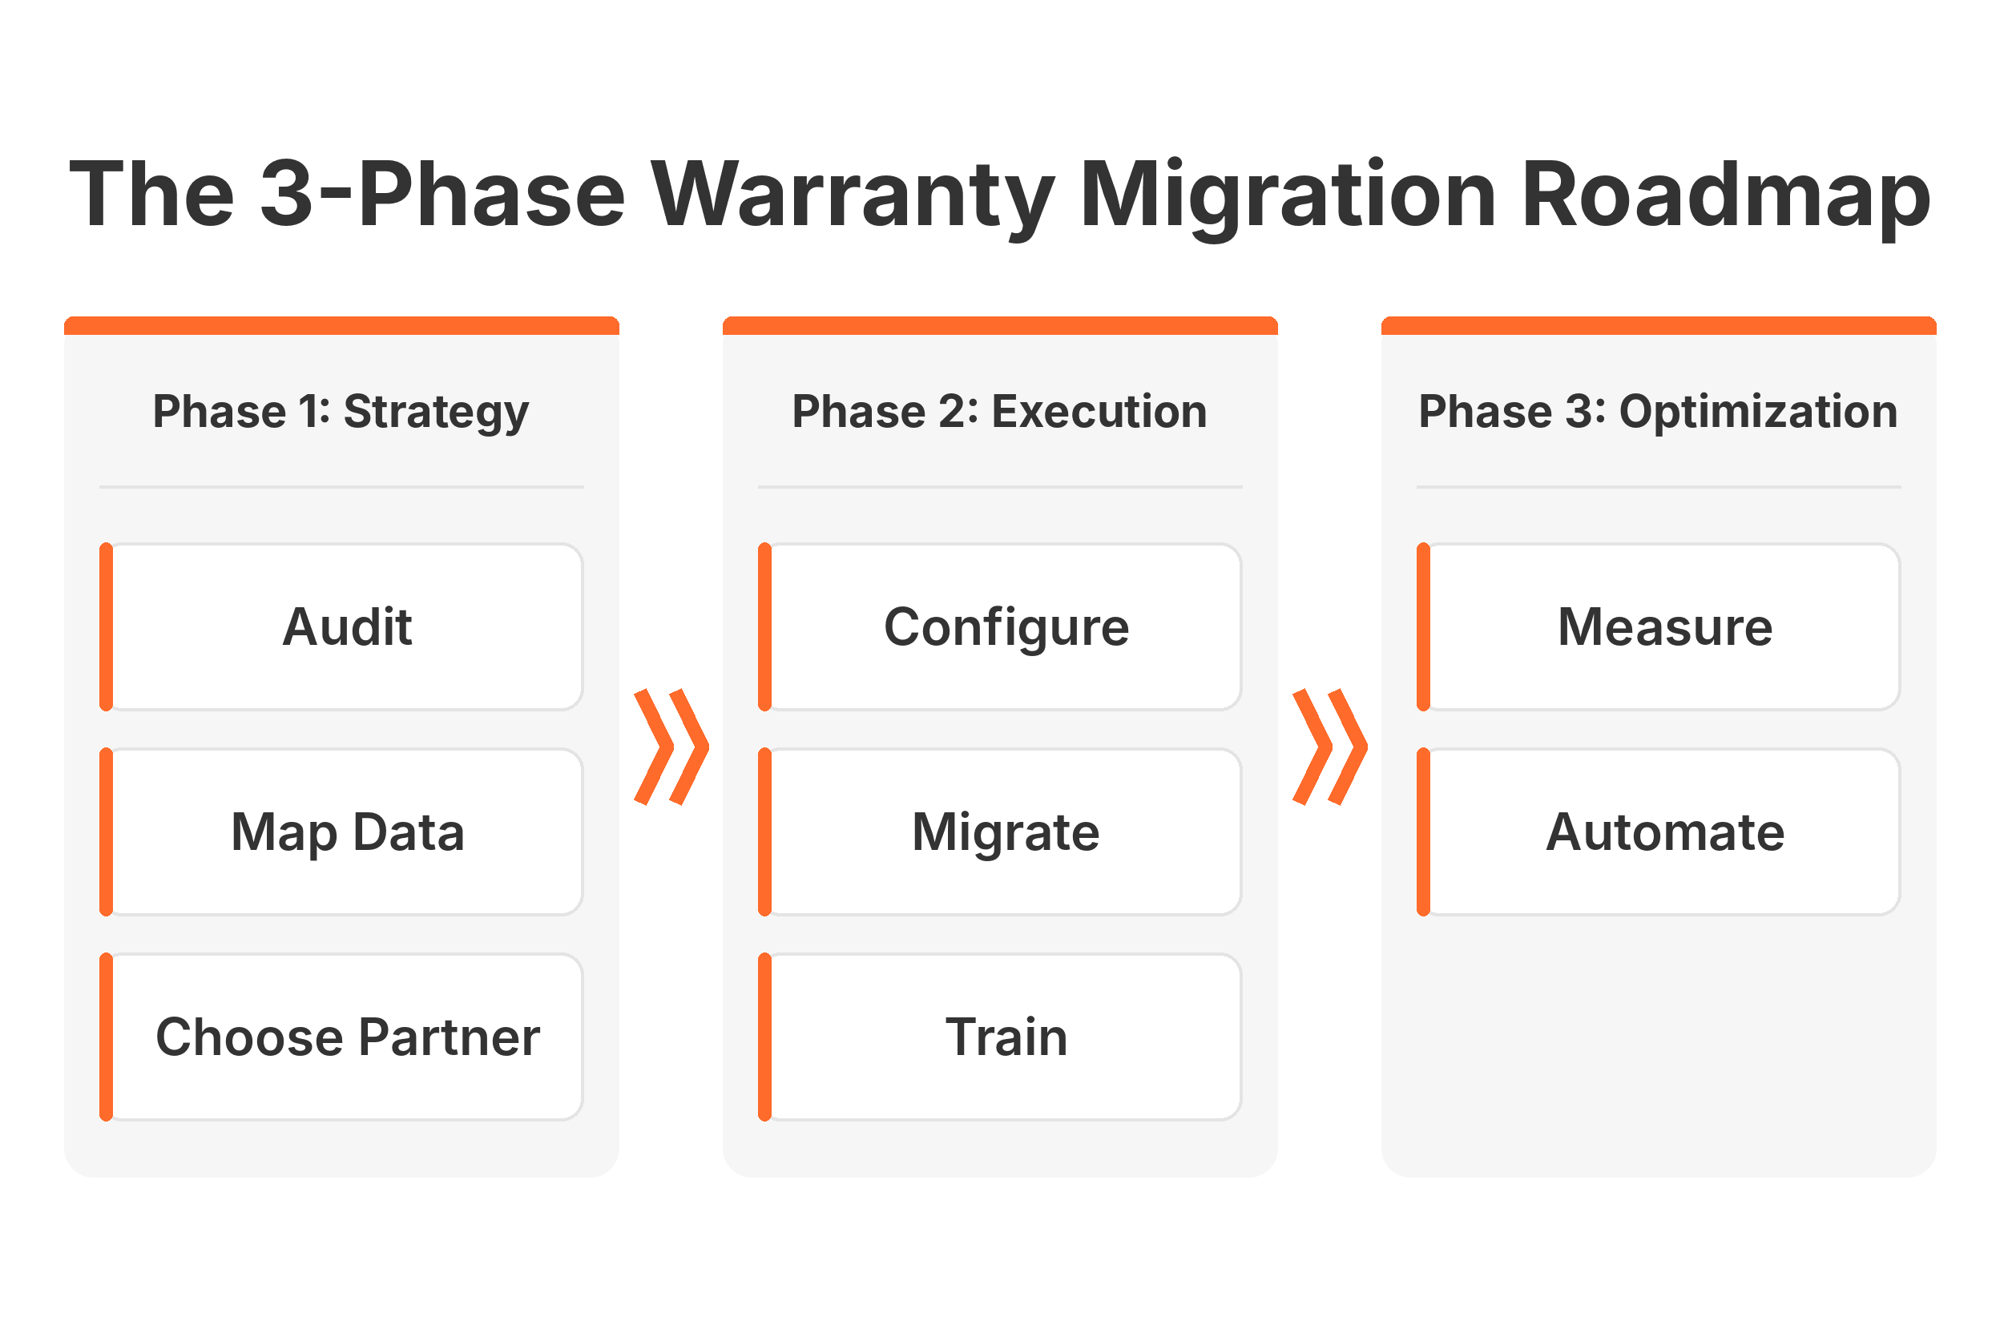
The 3-Phase Warranty Migration Framework
Migrations get overwhelming when all the work arrives at once. A warranty system project plan splits it into three phases, each with its own finish line.
- Phase 1: Pre-Migration Strategy. Audit where you stand, map your data, and choose your partner.
- Phase 2: Execution and Go-Live. Configure your warranty pages, cut over new claims, train the team, and brief customers.
- Phase 3: Post-Launch Optimization. Measure against your baseline, then automate what the data shows.
Each phase ends with something you can show leadership before the next one starts.
Phase 1: Pre-Migration Strategy & Planning
Phase 1 is the homework you do before a single record moves. It produces the business case leadership will ask for and the partner decision everything else depends on.
Step 1: Audit Your Current State & Define 'Success'
Before you change anything, write down how warranty claims run today. These numbers become your "before" snapshot: the baseline you will hold the new system against in Step 9, and the evidence that justifies the project.
Capture five numbers:
- Average claim resolution time, from submission to repair, replacement or credit.
- CSAT on warranty claims, measured separately from your overall support score.
- Agent hours per week spent on warranty work, spreadsheet updates included.
- Claim volume per month, so you can see whether volume changes after go-live.
- Tickets per claim, the number of times a customer writes in about one claim.
Pull at least three months of data so one unusual week does not skew the baseline. If your claims live in a spreadsheet, export it now. You will need the same file in Step 2.
For context, Gorgias Ecom Lab data shows first response times varying widely by vertical among brands of similar revenue, "from 1.6 hours in Hardware to 8.8 hours in Apparel". Your own baseline matters most, but it helps to know where your category sits.
Step 2: Map Your Warranty Data (And Decide What to Purge)
Clean data decides whether the new system starts useful or starts confused. Treat warranty data migration as a mapping exercise first: list every column in your spreadsheet or legacy tool and decide where each one belongs.
The core fields are Order ID, customer email, product SKU, purchase date and claim reason. Check that each is filled in consistently, because a claim with no purchase date cannot be checked against a warranty window.
That window is the next decision. AfterShip Warranty sets the warranty window at order level. If your catalog mixes warranty terms, set the window to your longest term, then use workflow rules on SKU or product type to block items whose shorter warranty has ended.
A legacy "registration" or "serial number" column stays in your own records. Keep it with your archive for older-purchase lookups.
Don't migrate garbage, and don't delete history. Move only clean, active data into your new process, and keep the full claim log as a read-only archive outside the new tool. Warranties that run two years, five years or a lifetime can outlive any purge date.
Step 3: Choose a Partner, Not Just a Platform
Judge the software the way you would judge a partner on a long project. Before you commit to an automated warranty management solution, ask four questions:
- How does your order history reach the new tool? AfterShip Warranty syncs order data automatically from your connected store.
- What happens to your old claims? They stay in your read-only archive, so plan the lookup routine now.
- What will customers see? A branded, self-service claim page, covered in Step 4.
- Where do your agents work? Warranty claims appear in the Zendesk and Gorgias sidebars, approval happens in AfterShip, and claim events reach Klaviyo.
Most platforms connect to the same helpdesk and email tools, so treat those answers as a readiness check for your warranty management system migration. The real difference is depth.
AfterShip's suite is shipping, tracking, returns, and warranty. AfterShip Warranty runs inside AfterShip Returns and is available from the Returns Premium plan. That keeps warranty, returns and order data in one Returns admin. The warranty period can start from the delivery date when AfterShip Tracking is connected, and carrier accounts are shared with Returns shipping. For a side-by-side view, see how AfterShip Warranty stacks up against other platforms.
Goodr once processed its returns in Google Sheets. Read how Goodr improved their post-purchase experience, or hear it from one of its team members:
"Warranties have been the bane of my existence for the last six years, and AfterShip finally makes them simple."
Phase 2: The Migration Execution Playbook
This phase answers the practical question of how to migrate warranty system work without stalling your team. Four steps, taken in order, get you to go-live.
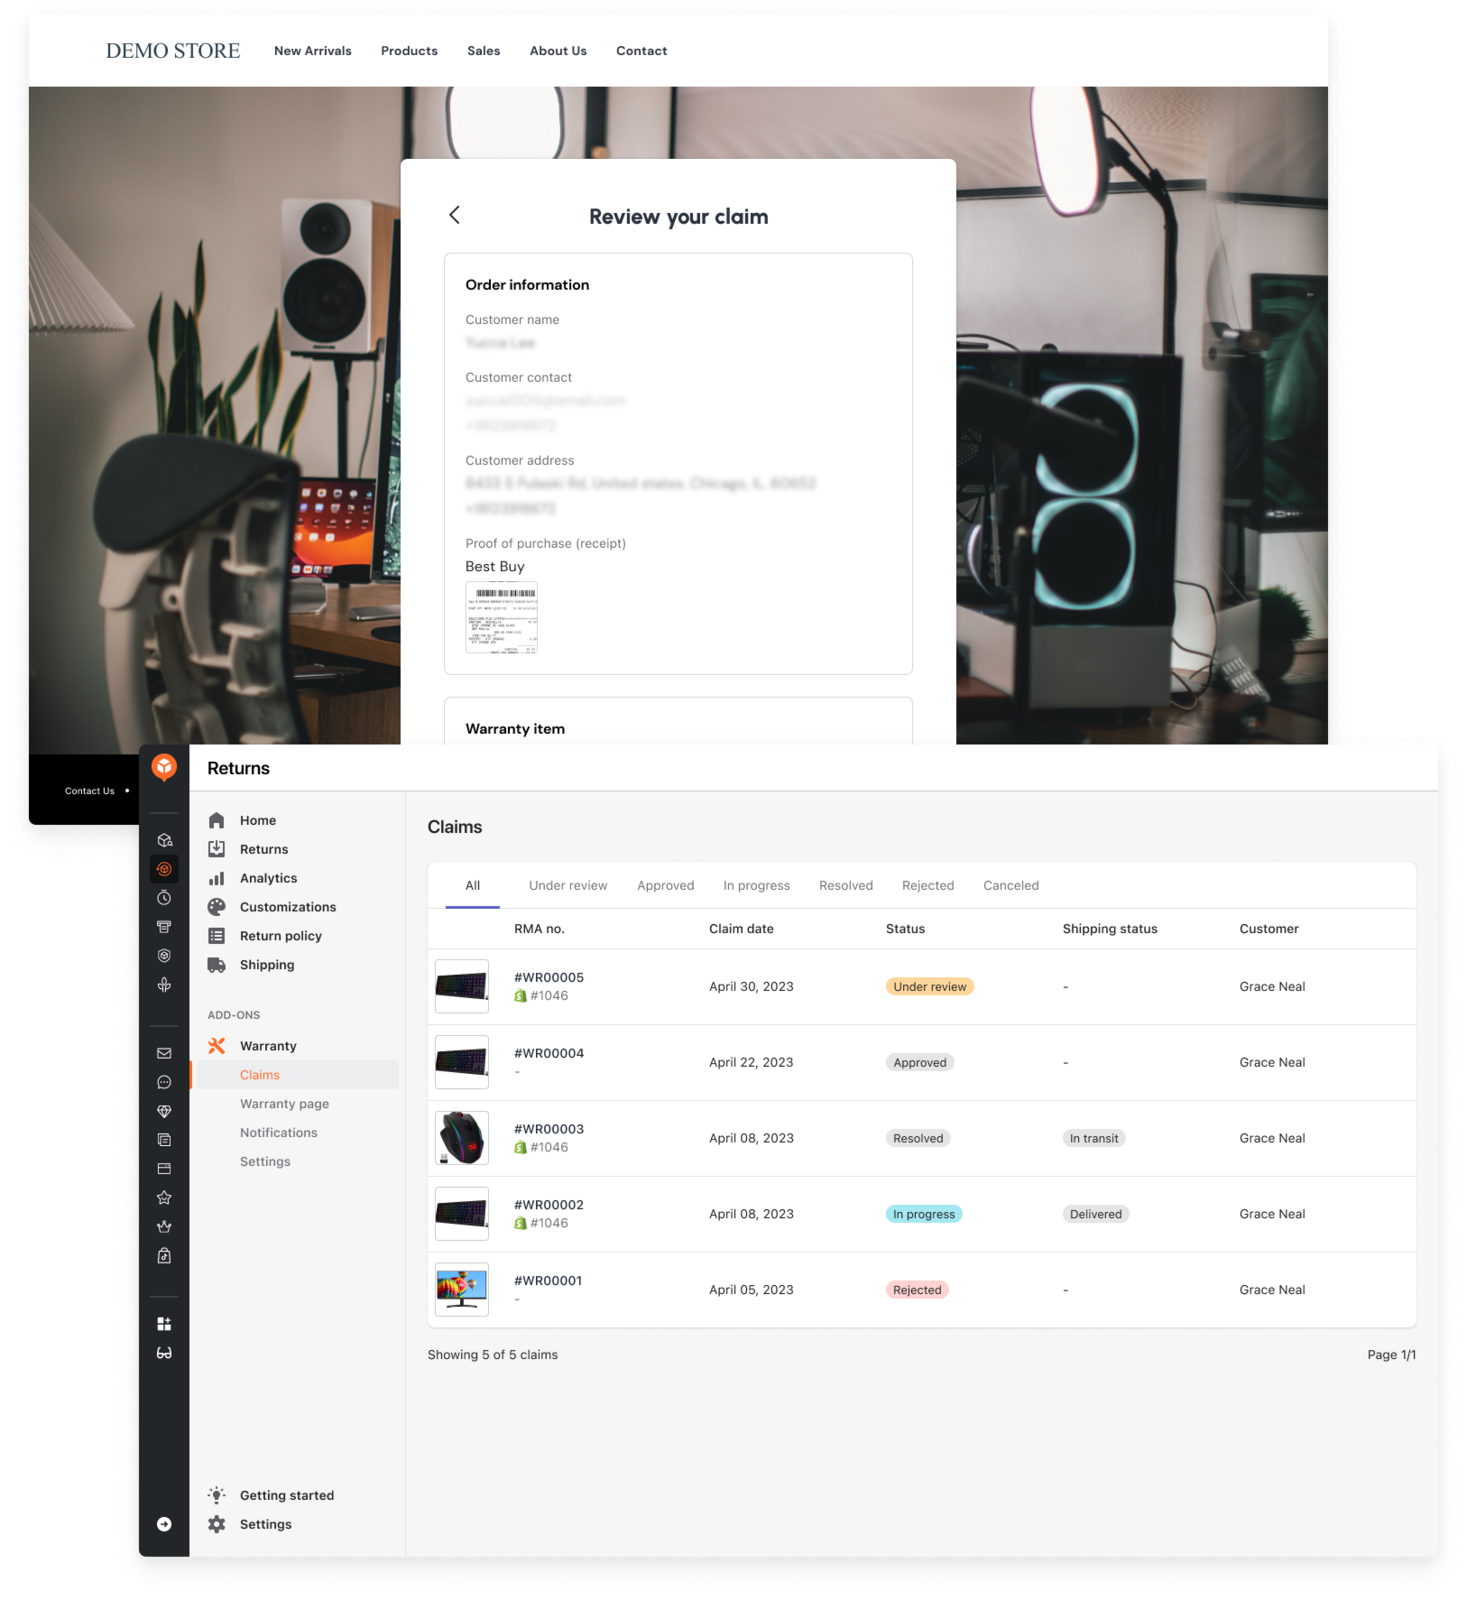
Step 4: Configure Your Branded Warranty Portal
Start with the page your customers will use. A self-service warranty portal that collects the right details up front means agents stop chasing photos and order numbers by email.
In AfterShip Warranty you can set up to 5 warranty pages for different sales channels. Match each page to your brand with your own colours, fonts, background and favicon. Then decide what a complete claim looks like:
- Evidence: customers can upload images, PDFs or videos with their claim.
- Field formats: set rules such as a serial number pattern so entries arrive clean.
- Page type: use order-number lookup for online orders, and a no-order-number page for purchases made through dealers, retailers or offline.
That second page gives every customer a route in, even if the purchase never touched your store.
Step 5: Execute the Data Migration (Phased vs. Big Bang)
Phased data migrations are safer for most e-commerce brands.
A big-bang cutover switches every channel to the new system on one day. A phased cutover changes one sales channel at a time.
For most DTC brands, a phased approach is safer. Start with all new claims in the new system, then retire your old intake in stages.
Phased here means cutting over the flow of new claims, channel by channel. It never means moving old records across in batches. From go-live, every new claim starts in AfterShip Warranty, and your order history comes in through the store connection. Keep your old claim log as a read-only archive your team can search, and route claims for purchases made through dealers or retailers to a no-order-number warranty page.
Intercom's help desk migration guide advises: "Run both platforms in parallel for two to four weeks before cutting over." Apply the same idea to one sales channel first, then expand once the new intake runs cleanly.
Step 6: Train Your Team for Empowerment, Not Just Process
Lead with what agents gain: order details arrive from the store, so nobody copies order numbers into a spreadsheet again, and their time goes into decisions.
Keep the training short and practical:
- System walkthrough: where claims land, what each status means, and where to approve or reject.
- Role-play: rehearse the claims your team sees most, including the awkward ones.
- Test claim, end to end: submit a claim, approve or reject it, and resolve it with a repair, replacement or store credit. This is also the last step of AfterShip's own setup sequence.
- Archive lookup: agree how agents check the old claim log when a customer asks about a purchase from before cutover.
- Q&A: leave time for questions after hands-on practice.
Step 7: Prepare Your Customer Communication Plan
Most customers will notice one change: a branded, self-service claim page with status emails at each step. AfterShip Warranty sends automated emails at 6 key claim statuses, and you can set the sender name and reply-to address so replies reach your team.
That means no mass email blast. The only customers who need a direct note are those with a claim still open in the old system. A short message is enough:
Your warranty claim is still in progress and nothing is needed from you. We will finish it with you directly, so there is no need to file again. For any new claim, use our updated warranty page.
From then on, every claim runs through your branded warranty page and its automated status emails.
Phase 3: Post-Launch: Measure, Automate, & Improve
Go-live is the midpoint of the project. The next three steps turn a working process into one that keeps getting easier to run, which matters as service automation accelerates. Gartner predicts: "By 2029, agentic AI will autonomously resolve 80% of common customer service issues without human intervention, leading to a 30% reduction in operational costs".
Step 8: The First 30 Days: 'Hypercare' & Feedback Loops
Hold a short daily check-in with your team for the first week. Ask what confused them, which claims felt slow, and where they reached for the old spreadsheet.
Keep the claims dashboard open while you do. A submitted claim stays Under review until it is approved, so a growing pile in that status is the earliest sign that a rule, a field or a training gap needs attention.
Fix small things the same day. After the first week, move to two check-ins a week until the 30 days are up.
Step 9: Measure Against Your 'Success' Metrics
After 30 to 60 days, pull the same five numbers you captured in Step 1 and set them beside your "before" snapshot.
A successful warranty system migration improves key CX metrics.
Your own before-and-after is the business case to show your boss: resolution time, warranty CSAT, agent hours, claim volume and tickets per claim, measured the same way twice. If a number has not moved, it tells you where to look in Step 10.
One customer's result, from the Goodr story above: After moving warranty and returns onto AfterShip, Goodr cut support tickets by about 60% and saw roughly 75% fewer warranty claims once its one-year warranty window was enforced automatically.
Step 10: Unlock Automation & Gain Insight
Set eligibility rules once (outside the warranty window, a blocked SKU, too many claims from one customer) so ineligible claims never reach an agent. Then let warranty shipping rules generate the right return label the moment an agent approves a claim. Teams with engineering support can also approve claims from their own systems through the Warranty API.
Modern warranty software automates claims and reduces agent workload.
Eligibility workflows take up to 50 conditions with AND/OR logic, so a rule can check details such as a customer tag or a product value before a claim can be submitted. Developers can also connect claim events to the rest of your stack; see the guide to integrating with your tech stack via webhooks.
AfterShip Warranty gives you claim, issue identification and resolution insights, with photo uploads and problem descriptions attached and products categorized so common issues stand out. Goodr's quality team now uses claim reasons to find product defects.
Your Migration Doesn't Have to Be Painful
A warranty migration still takes work, but with a structured plan it becomes a low-risk, high-reward project: new claims move first, history stays searchable, and every step ends with something you can check. AfterShip Warranty is built to make that sequence as simple as possible, from the first branded page to the first automated rule.
See how AfterShip Warranty handles your migration: book a demo.
Frequently Asked Questions
Can I import my old warranty claims into AfterShip Warranty?
New claims start in AfterShip Warranty from go-live, and your order history arrives through the store connection. Keep your old claim log as a read-only archive your team can search, so agents can still answer questions about purchases made before the switch.
Which AfterShip plan includes Warranty?
AfterShip Warranty runs inside AfterShip Returns and is available from the Returns Premium plan. It is part of AfterShip's suite of shipping, tracking, returns, and warranty.
Should we migrate our warranty system in phases or all at once?
In phases, for most brands. Start with all new claims in the new system on one sales channel, then retire your old intake in stages as each channel runs cleanly. Old claims stay in your archive throughout.
What data should we map before migrating warranty claims?
Map Order ID, customer email, product SKU, purchase date and claim reason, and check that each is filled in consistently. Then set the warranty window. AfterShip Warranty sets the warranty window at order level. If your catalog mixes warranty terms, set the window to your longest term, then use workflow rules on SKU or product type to block items whose shorter warranty has ended.